The Symmetry Jacket & Vest — Vogue 1970

Dubbed ‘The Symmetry’ while developing the design, Vogue 1970, is a figure flattering princess-seamed jacket and vest designed to layer together. I always consider my own wardrobe needs when developing a pattern and this pair can be worn together or separately and will work in a range of fabrics across the seasons.
Why ‘The Symmetry’? Because my first prototype was asymmetrical and much more difficult to make, so, on the advise of my wonderful group of pattern testers, the pattern maker and the Vogue Patterns design director, I simplified things and am very happy with the result.

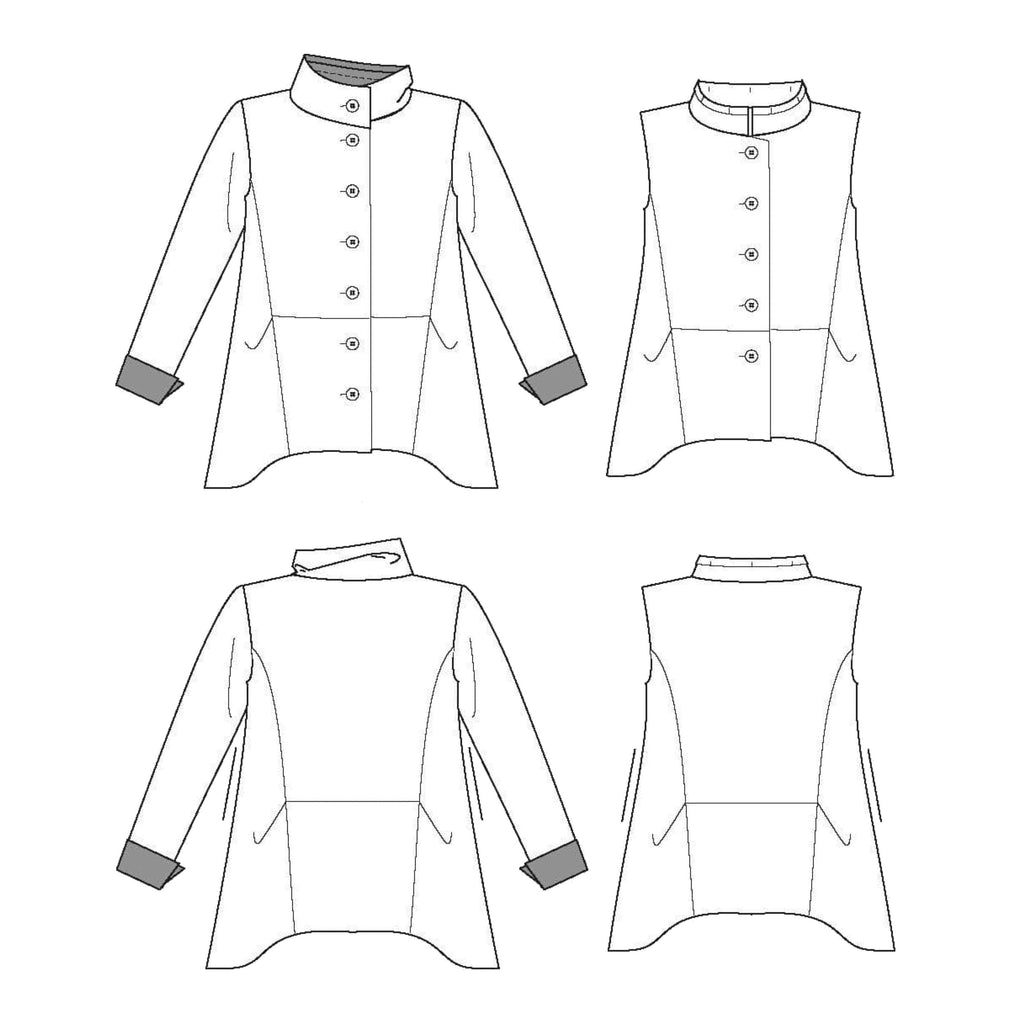
V 1970 features a semi-fitted jacket and vest with princess seaming details in 2 lengths and 2 collar variations.The jacket is longer by one inch than the vest and has a stand-up collar with tuck at the back neck, while the vest features a smaller stand-up collar with a turned under and stitched edge as a design detail. Both jacket and vest feature in-seam pockets. The jacket is an inch longer than the vest, note that it is easy to add length to either garment at the hem. The jacket features a faced sleeve hem with a vent, and I used a contrasting fabric here. The princess seams feature a horizontal seam and tuck. Lightly fitted in the bust with a shaped flare at the hem, both garments are designed to be worn over a light t-shirt or top.


For the pattern envelope I used a Japanese cotton in a quilting weight for the jacket, and linen for the vest. Other suggested fabrics are jacquard, brocade, denim, mid weight silks, suiting weight wool, stable knits, corduroy or velveteen.


See how the pieces layer together:

2. For a 1” turned under hem, serge the hem edge


Why ‘The Symmetry’? Because my first prototype was asymmetrical and much more difficult to make, so, on the advise of my wonderful group of pattern testers, the pattern maker and the Vogue Patterns design director, I simplified things and am very happy with the result.
V 1970 features a semi-fitted jacket and vest with princess seaming details in 2 lengths and 2 collar variations.The jacket is longer by one inch than the vest and has a stand-up collar with tuck at the back neck, while the vest features a smaller stand-up collar with a turned under and stitched edge as a design detail. Both jacket and vest feature in-seam pockets. The jacket is an inch longer than the vest, note that it is easy to add length to either garment at the hem. The jacket features a faced sleeve hem with a vent, and I used a contrasting fabric here. The princess seams feature a horizontal seam and tuck. Lightly fitted in the bust with a shaped flare at the hem, both garments are designed to be worn over a light t-shirt or top.
For the pattern envelope I used a Japanese cotton in a quilting weight for the jacket, and linen for the vest. Other suggested fabrics are jacquard, brocade, denim, mid weight silks, suiting weight wool, stable knits, corduroy or velveteen.
See how the pieces layer together:
Sewing tips:
- Do check the fit at the bust and determine your best finished length before cutting.
- When making in seam pockets, I finish the outer edges of the pockets with a serged edge, then serge the pocket to the side seam at the same time as finishing the seam edge.
- Interfacing is optional depending on your fabric choice. Always test to determine the best results.
- Construct the front and back and collar before setting the sleeve. Always check the sleeve placement by trying on the garment with the side seams basted or stitched to see that the shoulder line is right for you. I often narrow the shoulder a bit, but do not change the sleeve when making this adjustment. I find a narrower shoulder can be more flattering.
- Optional Sleeve Lining
- Cut the sleeve lining a bit bigger and longer than the garment sleeve so it will float inside the sleeve, not tugging anywhere.
- Stitch ½” around the sleeve cap - this gives a line of reference when sewing the sleeve lining in by hand.
- Finish the hem and sleeve seam before sewing the sleeve in place.
- After stitching the sleeve in place, ‘walk’ the lining up to the armhole/cap, pin/baste and hand stitch in place.
Two Hem Options:
1. The hem is finished using a bias binding, because the hem has a slight curve.- Cut a strip of bias the length of the hem plus a bit (a bit longer makes it easier to handle, trim when done), x 3” wide - again, you can trim as needed.
- Stitch bias to hem, trim, clip seam as needed, press.
- Press bias strip to an even width, folding under the raw edge.
- Stitch in place by hand.
2. For a 1” turned under hem, serge the hem edge
- Do a line of stitching along the hem fold line through single thickness. This gives a line to make pressing easy and consistent.
- Press under hem, using the stitching line as a guide.
- Stitch by hand or machine
Marcy’s Versions
My first prototype used a panel print in a mid weight stretch cotton.
Black Cut Corduroy Jacket
All last fall and winter, the one piece I kept thinking about and wanting in my wardrobe was a black corduroy jacket. Wished for it in Paris last fall and again back home last winter. Making this jacket was a pleasure and sometimes a struggle.

Design changes and decisions
- Eliminated the horizontal seams front and back to keep the line simpler because of the thickness of the corduroy.
- Cut the under collar, facing and sleeve from a striped men’s lining fabric in my stash, used the last scraps of a fabric I had been saving.
- Made a back half lining across the upper half of the back. Ran out of the striped lining, so chose a black Bemberg lining in a twill weave that has the same (heavier) weight as the striped lining.
- Chose lining fabrics so garments worn underneath would slide more smoothly under the jacket and to reduce bulk in the collar and facing areas.
- Spent an afternoon fine-tuning buttonholes making sample after sample to get it right - because the pile of corduroy could make a normal buttonhole disappear. After all the testing, I used a wider stitch combined with a wider gap between the 2 stitching lines
- The fabric is supple yet firmly woven, and it took 3 tries to set the sleeves. I ended up using the old-school sewing technique of making 2 rows of basting stitches, notch to notch at ¼” and ½” apart.
- Crucial to success, I used a walking foot throughout.
- Finished the hem with a bias hem facing. This makes for a smoother curve and flatter hem. The lining facing helps the jacket to hang well and keeps the corduroy from sticking to other fabrics worn beneath.


|
Posted on September 07 2023