THE BASIC CORE
Adjust and adapt to your own needs.- Coat that goes over everything (raincoat, winter coat, duster….).
- Jacket that layers under the coat, over the vest and cardigan.
- Vest that fits under (or over), the coat and jacket.
- Knit Top/s, T-Shirt or Shell (could be knit, bias, surplice wrap etc....) that has your best neckline, body shaping and sleeve length, and will nest under the vest/jacket/coat.
- Pants Slim line pant or soft pant in a silhouette and length that flatters your figure.
- Cardigan that goes over the t-shirts and under the jacket or vest.
- Shirt your version of a shirt or shirt jacket that works with pants, might layer over the t-shirts and tops --- ideal if the vest slips under or over. Ranges from a classic shirt to jean type jacket, to Miyake-esque big shirts.
- Skirt in a shape and length that works on your figure, in your life and goes with the above tops.
- Dress in your best shape and length that will layer under the coat or jacket or cardigan.
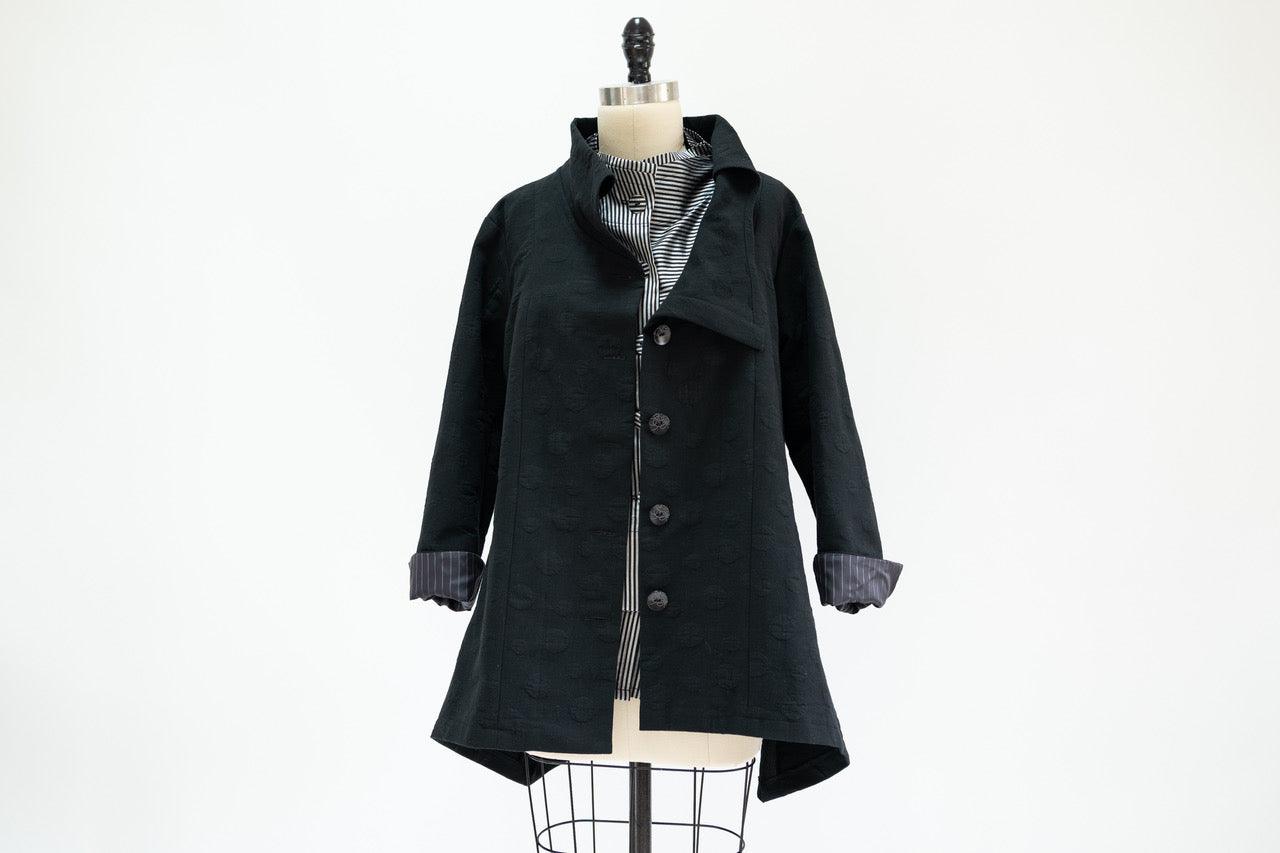
Black Japanese Cotton Jacquard Jacket

I used a cotton jacquard, which I tossed in the washer/dryer before sewing. The black color faded just a touch and the fabric became softer with more loft. I know that I will always wear a black jacket, love that this one has a subtle surface interest, but is still neutral enough to wear with patterned tops and pants. The shape is flattering, (a princess seam coming from the shoulder is always a good idea), and the collar is fun and easy to sew once I figured out how it goes together. In fact, I like this design so much that I want to use the same pattern to make a shirt…I’d make the front symmetrical, using just the right side of the front and collar, maybe in linen or a shirting fabric, so it could also be a light weight summer jacket.


Sewing and Design Tips
- Lengthened the body about 1-½”.
- Lengthened at the hem about 3-½”.
- Converted the one piece sleeve to a two piece sleeve using these instructions from Threads.
- Lined the sleeve to the edge with a silky smooth striped acetate lining.
- Adjusted the sleeve length. Sewed the sleeve in place, pressed.
- Adjusted the sleeve lining so it is about ½” longer than the sleeve, sewed the lining together.
- Stitched a row of stay stitch plus around the cap of the sleeve lining. This eases in the fullness and the stitching makes it easy to turn under the seam allowance.
- The Sew Everything blog gives a good description of stay stitch plus.
- Sew the lining to the sleeve at the hem. I added the vent when sewing the lining to the sleeve hem.
- Finished the back neck edge with narrow bias.
Silk Taffeta Vest

I love silk taffeta, chose it because it will make a thin layer that is warm when worn under a jacket or coat and makes a good top layer on warmer spring days. I tossed the fabric in the washer/dryer before sewing - it came out with allover wrinkles which I pressed. The fabric softened, lost some of the sheen and some of the wrinkles remain - love that! Also love that the vest nests beautifully under the jacket.


Sewing and Design Tips
- Lengthened the body of the vest about 1-½”.
- Lengthened the peplum 3”.
- Did a FBA (full bust adjustment).*
- Cut the stripes going different ways. (had to re-cut one peplum piece to adjust for this).
- Narrowed the collar height by about 1”.


